How Is PU Stone Made? Process, Benefits, and How to Judge Quality
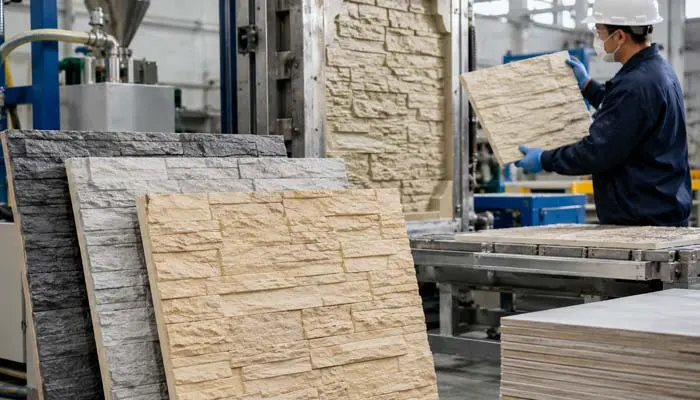
PU stone is made by mixing polyurethane chemicals, pouring them into a textured mold, letting the mix foam and cure, then trimming, coloring, and coating the panel. The mold gives the stone look. The foam gives the light weight.
Check these before you buy:
- Weight: Often under 5 kg/m². Natural stone veneer can pass 40 kg/m². Confirm the real weight.
- Water: Tested by ASTM D2842. Good closed-cell foam often absorbs under 5% by volume.
- Fire: Ask for the class. ASTM E84 (US), EN 13501-1 (EU/UK), AS 5637.1 (AU/NZ).
I have reviewed decorative wall materials for over five years. Realistic color is only one sign of quality. Mold detail, panel weight, edge condition, and test data tell you more. This guide explains how PU stone wall panels are made, and how to judge them.
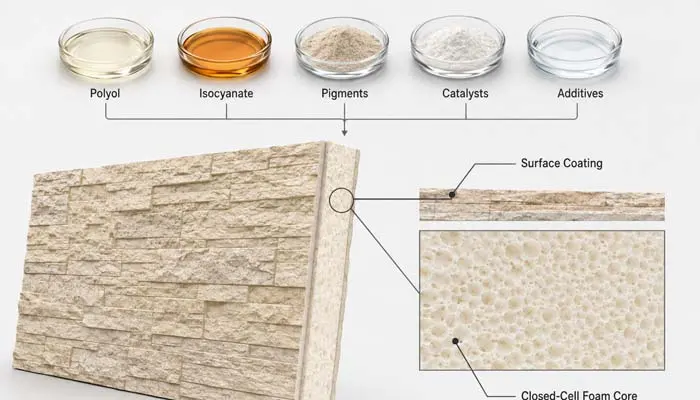
Table of Contents
What Is PU Stone Made Of?
PU stone panels are made from a polyurethane system, pigments, and additives. “PU” means polyurethane.
Two liquids form the polymer. A polyol reacts with an isocyanate. This reaction builds the rigid polyurethane structure. Makers can tune the recipe to change density, stiffness, and cell structure.
Other parts do specific jobs:
- Pigments set the base color.
- Catalysts control the reaction speed.
- Blowing agents create the foam cells.
- Release agents help remove the panel from the mold.
- Flame-retardant and UV additives appear in some grades.
The recipe changes by maker and grade. So the word “polyurethane” alone does not prove a fire rating, a water value, or an outdoor life. Ask for the data on the exact panel.
Closed-Cell Foam Makes the Panel Light
The core is rigid foam with many closed cells. Closed cells are sealed by thin polymer walls. They do not form one open network. This structure lowers weight and blocks many water paths. Typical rigid decorative PU foam sits near 200–400 kg/m³. Solid natural stone is far heavier.
| Component | Role |
|---|---|
| Polyol + isocyanate | React to form the polyurethane structure |
| Blowing agent | Creates foam cells and lowers weight |
| Pigments | Set the color |
| Catalysts | Control the reaction |
| Additives | Add fire or UV resistance in some grades |
| Coating | Protects the visible face |
How Are PU Stone Panels Made Step by Step?
PU stone panels follow eight main steps: mold, measure, mix, foam, cure, trim, color, and inspect.
Step 1 — Mold. A textured mold holds the stone shape. Makers copy real rock or carve a master pattern. Cracks, layers, and raised areas are built into the mold. This is not a printed photo of stone.
Step 2 — Measure. The chemicals are dosed by a set ratio. Pigments and additives go in here. Exact dosing keeps the foam and cure stable.
Step 3 — Mix. The parts are blended fast and evenly. Weak mixing gives weak, uneven panels.
Step 4 — Foam and mold. The mix expands and fills the mold. The foam forms the light core. The mold forms the stone face. One step does two jobs.
Step 5 — Cure. The panel sets until it is firm enough to remove. Curing depends on the recipe and the line. Removing it too early can warp the panel.
Step 6 — Trim. The panel leaves the mold and edges are cut to size. Corners, joints, and thickness are checked here.
Step 7 — Color and coat. Workers add tones to raised areas, cracks, and edges. One flat color looks fake. A top coat can guard against sun, stains, and moisture.
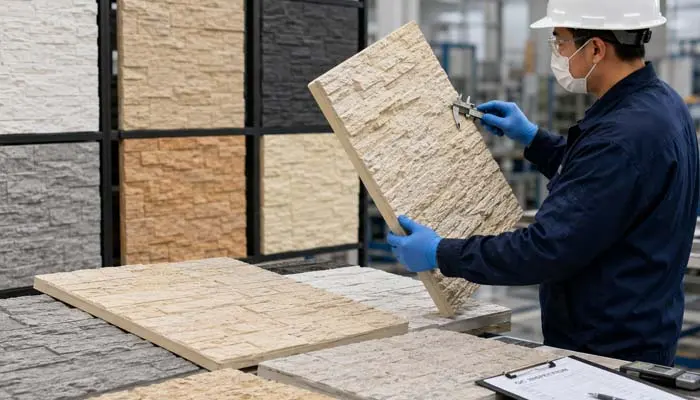
Step 8 — Inspect. Panels are checked against the spec. Checks cover size, edges, color, surface, and weight. Some grades add lab tests.
| Step | Job | Result |
|---|---|---|
| 1 Mold | Hold the stone shape | Surface texture |
| 2 Measure | Dose the chemicals | Stable recipe |
| 3 Mix | Blend the parts | Even foam |
| 4 Foam and mold | Expand in the mold | Light core and stone face |
| 5 Cure | Set the polymer | Safe to demold |
| 6 Trim | Cut to size | Panels that align |
| 7 Color and coat | Finish the face | Natural look and protection |
| 8 Inspect | Check the spec | Steady batches |
Why the Process Creates the Benefits
The main benefits come from the foam core, the molded face, and the coating.
Light weight. The foam core replaces solid stone with sealed cells. Light panels are easier to lift, cut, and fix. Confirm the weight per square meter, since thickness and density change it.
Low water uptake. A closed-cell core blocks many water paths. But no panel is “100% waterproof” on its own. Joints, coating, substrate, and fixing all matter. A tested ASTM D2842 value beats any waterproof slogan.
Faster install. Light panels and set sizes cut handling time. Large panels cover more wall than many small stones. Real speed still depends on the wall, the layout, and the installer. Most panels fix with construction adhesive, or with screws onto battens or cement board.
Natural look. Deep molds give real shape. Layered color gives real variation. You need both. A deep mold with flat color still looks fake. Good color cannot fix a shallow mold.

PU Stone vs Natural Stone and Other Options
PU stone is one of several stone looks. Each is built in a different way.
| Factor | PU stone | Natural stone | Cultured stone / GFRC | Flexible stone veneer |
|---|---|---|---|---|
| Base | Molded PU foam | Quarried rock | Cement mix | Thin real stone |
| Weight | Very light | Heavy | Heavy | Light |
| Texture | Molded | Natural | Molded | Real surface |
| Cutting | Easy | Needs stone tools | Needs tools | Easy |
| Look | Imitates stone | Authentic | Imitates stone | Real stone |
Factory panels give steady sizes and light weight. Natural stone gives real, one-of-a-kind grain. Compared with natural stone, faux panels win on weight and speed, but not on true depth. Flexible stone veneer uses a thin layer of real stone for a middle path. Cultured stone and GFRC are cement-based, stronger, and heavier.
The right pick depends on the project. Weigh the wall’s load, the climate, the budget, and the finish you want.
Cost: What to Expect
PU stone usually costs more than paint or plain PVC. It usually costs less than a full natural stone install. Its light weight also cuts shipping and labor cost. Prices vary by panel size, texture, and coating. Ask for a price per square meter, not per piece.
How to Judge Quality
Judge a panel by texture, edges, weight, coating, and test data. Do not judge by one photo.
Check several panels, not one. Place a few panels together and look for repeated textures. Then step back 3 meters. Distance makes repeated patterns easy to see.
Check edges and weight. Look for broken corners, voids, warped faces, and uneven thickness. Weigh panels of the same size. Big weight gaps are a warning sign.
Ask for fire ratings and test standards. A “fireproof” label is not enough. Ask for the method, the class, the lab, and the date.
| Region | Standard | What to ask for |
|---|---|---|
| US / Canada | ASTM E84 | Class A, B, or C (flame spread) |
| Europe / UK | EN 13501-1 | Euroclass (A1 to F) |
| Australia / NZ | AS 5637.1 (AS/NZS 3837) | Group Number (1 to 3) |
Confirm outdoor use. An indoor panel is not automatically fit for a facade. If the panel will be used outdoors, ask for UV and weather data (ASTM G154 or ISO 4892) and a matching warranty.
Conclusion
PU stone gets its light weight and stone look from foam, molds, curing, color, and coating. The same base material gives different results when the recipe or the controls change. So judge panels by real samples, steady quality, and lab data, not by slogans.
Want to compare in person? Request free samples and product-specific test reports before you choose. You can also browse the full stone panel range.
FAQ
Is PU stone real stone? No. The body is molded polyurethane, not quarried rock. The look comes from the mold and the paint. Call it faux stone or PU stone cladding.
Is PU stone waterproof? Not fully, on its own. Closed-cell foam lowers water uptake. But joints, coating, and install decide the wall’s real performance. Ask for the ASTM D2842 value.
Can PU stone be used outdoors? Only if that exact panel is made and tested for outdoor use. Confirm UV data, weather data, coating, and fixing method first.
How long does PU stone last? There is no single number for all panels. Life depends on the coating, the sun, the climate, the install, and care. Use the product’s own weather data and warranty.
Related Post
Share

Contact with us
※ We'll contact you within 24 hours. Check out the spam box in case that the mail is blocked.
Latest blog


How Many Acoustic Panels Do You Need for a Room?
August 10, 2026